Recently I’ve been working on implementing custom visualizations for the Boost.Unordered containers in the Visual Studio Natvis framework, to provide an identical debugging experience in the Boost.Unordered containers to what we get for the STL containers. Here is the file.
This has been a tricky process, and I found the natvis documentation online to be lacking a few key pieces of information I needed. With this (and subsequent) article, I will take you through the experience of implementing the natvis file for Boost.Unordered.
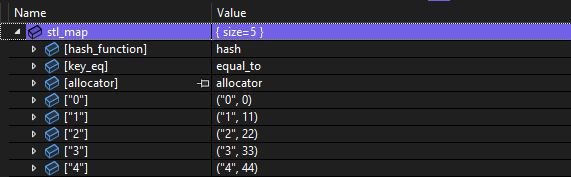
Compare how easy it is to read the std::unordered_map
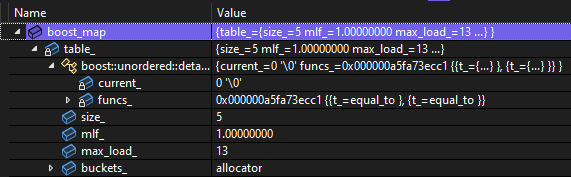
with how difficult it is to read the boost::unordered_map.
This article is about the natvis implemention for the closed-addressing containers, which all have the same internals. These are the boost::unordered_map, boost::unordered_multimap, boost::unordered_set, and boost::unordered_multiset, the drop-in replacements for the standard unordered containers. Boost.Unordered has other containers that aren’t exact drop-in replacements that give better performance. My next article will be about the natvis implementation for those containers. This work has been sponsored by The C++ Alliance.
What natvis is and what natvis isn’t
Simply put, you use a .natvis file to tell the Visual Studio debugger exactly how to display your complex type. The nicely manicured display of std::unordered_map in the screenshot above is a result of what’s written in STL.natvis, which comes packaged with Visual Studio.
The .natvis file format is an XML file, following the schema located at [VS-install-path]\2022\Community\Xml\Schemas\1033\natvis.xsd. Substitute 2022 and Community for whatever you have. At the top level there is an <AutoVisualizer> element, which contains many <Type> elements. Each <Type> is a visualization for a specific type or for a family of types. You can define multiple “overloads” with different priority levels. The highest priority overload is tried first; if it hits an error, then the next overload is tried.
Because natvis files are XML, any special characters need to be escaped inside expressions. For example, instead of vector<int>, you need to write vector<int>.
Importantly, natvis files deal in data only. No functions. From the official documentation:
Natvis expressions don’t allow function evaluation or side effects. Function calls and assignment operators are ignored.
I originally missed this when reading through the documentation, so it’s possible that others did too. If you choose to call any C++ function on your type in a visualization, the Visual Studio debugger will not calculate or display the result unless you explicitly click the circular arrow with the hover text “Click this button to evaluate now”. Even then, it may not work. This limitation means that any visualization you create should only deal in data members, otherwise the users may have a worse experience because of it.
However, there is an escape hatch. We can define our own functions within the natvis file. These are created in <Intrinsic> elements.
First motivation for natvis <Intrinsic> elements
To start matching the STL visualization, I want to output the [hash_function] and [key_eq] entries. In boost::unordered_[multi]{map|set}’s case however, there are also “spare” functions. This all happens inside the detail::functions class, so let’s isolate it and start by implementing a visualization for this class. We use a * character as a wildcard matcher, to denote all possible instantiations of the class template.
<Type Name="boost::unordered::detail::functions<*>">
...
</Type>
This class consists of 2 compressed pairs of functions, and a byte telling us which pair is active. Here is a pseudo-code class definition.
// Pseudo-code class definition
template <class Hash, class Equal>
class functions {
    using function_pair = compressed<Hash, Equal>;
    unsigned char current_;
    opt_storage<function_pair> funcs_[2];
};
Here is the first hurdle: a compressed pair either has a data member or it doesn’t. Remember that visualizations must use data members. So what do we do?
Here was my process for grabbing the first hash function. Note that type aliases inside the class can be used freely. For example, the alias function_pair is defined inside the detail::functions class. Also note that template parameters are grabbed with $T1, $T2, etc. Luckily, using static_cast works normally for converting to a base class pointer, even with multiple inheritance, and reinterpret_cast works everywhere.
- Grab the first compressed pair:
funcs_[0].t_
- Convert it to the pair’s first base class:
static_cast<function_pair::base1*>(&funcs_[0].t_)
- This base class ultimately derives from
boost::empty_value<$T1>, which either stores a $T1 if $T1 is non-empty, or it itself it empty. Therefore we can safely reinterpret_cast to $T1*.
- The final expression (without XML escaping) for the first hash function is:
*reinterpret_cast<$T1*>(static_cast<function_pair::base1*>(&funcs_[0].t_))
This needs to be duplicated for the key_eq function, then the whole thing needs to be duplicated for the second compressed pair, then the whole thing needs to be duplicated again for the active vs spare distinction when displaying. After all that, it’s an 8-fold replication with minor tweaks to an expression that’s already very complicated and unwieldy. There’s a lot of room for error. I want to do better, using <Intrinsic>s.
First usage of <Intrinsic> elements
First I’ll create some querying intrinsics about the current state of the detail::functions class. All of this state is stored in the variable current_;
<Intrinsic Name="active_idx" Expression="current_ & 1" />
<Intrinsic Name="spare_idx" Expression="1 - active_idx()" />
<Intrinsic Name="has_spare" Expression="(current_ & 2) != 0" />
I could specify the return type of the intrinsic, but that’s not important here, with such simple expressions.
Then the hash and equality function objects can be computed with parametrized <Intrinsic> elements. The official natvis documentation doesn’t mention <Intrinsic> elements with <Parameter> sub-elements. I’ll discuss those more thoroughly in the next section.
<Intrinsic Name="hash" Expression="*reinterpret_cast<$T1*>(static_cast<function_pair::base1*>(&funcs_[idx].t_))">
<Parameter Name="idx" Type="size_t" />
</Intrinsic>
<Intrinsic Name="key_eq" Expression="*reinterpret_cast<$T2*>(static_cast<function_pair::base2*>(&funcs_[idx].t_))">
<Parameter Name="idx" Type="size_t" />
</Intrinsic>
Importantly, I can only call funcs_[idx] here because funcs_ is a C array, and this is a built-in operation. If the expression funcs_[idx] would call into a user-specified operator[](), this would not be allowed.
Finally I use these intrinsics in the <Expand> section, where all the visualization entries are specified.
<Expand>
    <Item Name="[hash_function]">hash(active_idx())</Item>
    <Item Name="[key_eq]">key_eq(active_idx())</Item>
    <Item Name="[spare_hash_function]" Condition="has_spare()">hash(spare_idx())</Item>
    <Item Name="[spare_key_eq]" Condition="has_spare()">key_eq(spare_idx())</Item>
</Expand>
Note that the “spare_” functions are only displayed when has_spare() returns true, as specified in the Condition attribute. They are not present otherwise.
All this allows the large unwieldy expression to only be written twice, instead of 8 times.
Parametrized <Intrinsic> elements and overload sets
You can add parameters to your <Intrinsic> elements. It’s in the schema and it works in practice, but it isn’t documented on the official page. Here are some restrictions and possibilities for parametrizing your natvis intrinsics.
- Every
<Parameter> element must specify the Name and the Type attributes. To me, it is obvious that the name must be specified, but it is less obvious for the type. This leads to a related rule.
- A
<Parameter> cannot be generic. The parameter can accept a $T1 or any other template parameter of the class, but this is not generic from the class’s perspective. However,
- Multiple
<Intrinsic> elements can be defined with different <Parameter> types. For example, you can create 2 identically named intrinsics, where one takes an int and the other takes an int*.
- A
<Parameter> can only be a fundamental or pointer type. Because this includes pointers, I didn’t find it to be a restriction. Instead I just passed a Type* instead of a Type, and carried on.
- A parameter can be modified in the intrinsic. This is only allowed if the
<Intrinsic> element has specified the attribute SideEffect="true". For example, you can pass in an int* and modify the pointed-to int. I don’t use this feature at all, but it may be useful to you.
- No recursion. No self-recursion or mutual recursion.
Another important point about <Intrinsic> elements, which isn’t strictly about parameters: You can make it so that failure is not an error. If you specify the attribute Optional="true" on the <Intrinsic> element, then any semantic error causes the <Intrinsic> to be omitted. The regular behaviour would cause the entire <Type> to be omitted. This means you can specify multiple intrinsics with the same name, where only 1 of them is semantically valid. This is another way to create an overload set.
Imagine that your type either has a member x or a member y depending on its template parameters. No problem, you can grab them uniformly with this type of overload set.
<Intrinsic Name="get_value" Expression="x" Optional="true" />
<Intrinsic Name="get_value" Expression="y" Optional="true" />
Only one of these will be valid, and the other one will fail. But that doesn’t matter. They can be used like this.
<Expand>
    <Item Name="[member]">get_value()</Item>
</Expand>
Instead of messing around with the Condition attributes on the <Item> elements, this acts as a simple way to unify it all. This is a method I used later on, but I wanted to mention it now.
Lastly, also not related to parameters, <Intrinsic> elements can only be used in <Type> elements without the IncludeView attribute. I hit a roadblock for a while until I figured this out. If you have multiple <Type> elements for the same type, all of the <Intrinsic> elements must go on the <Type> without any views. You can even make an extra <Type> element to hold all your <Intrinsic> elements, if you don’t already have one.
Note that the IncludeView="abc" attribute on a <Type> element says that this visualization should be used when we use the “abc” view, but not otherwise. For example in the Visual Studio watch window, instead of writing just myVar, write myVar,view(abc).
For example:
<Type Name="MyClass">
    <Intrinsic Name="get" Expression="..." />
    ...
</Type>
<Type Name="MyClass" IncludeView="abc">
    <Expand>
        <Item Name="X">get()</Item>
    </Expand>
</Type>
<Type Name="MyClass" IncludeView="xyz">
    <Expand>
        <Item Name="Y">get()</Item>
    </Expand>
</Type>
Hopefully this will help you, whoever is reading this. It’s a list I would have appreciated when I was figuring it all out.
But we haven’t even started outputting the map elements.
A strategy to read the table
Just like a ouija board.
Inside an <Expand> element, you can create <Item> elements, which are the simplest way of directly outputting a visualization entry. Otherwise, there are more complex elements that exist, either to do more complex things, or to simplify some common things. Most powerful of all is the <CustomListItems> element, which acts as an inline subroutine. This is what I’m using to walk the map.
Theoretically, the easiest way to output all the elements of the map or set would be the following.
- Create an iterator that’s equivalent to
begin()
- Call
operator*() and output a visualization entry
- Intersperse calling
operator++() and operator*() until the iterator compares equal to end()
But this doesn’t work, for 2 main reasons.
- We can’t create an iterator variable, since we can’t create an object of class type.
- We can’t call class member functions. We can only work on data.
In the end, here’s the real strategy we need to take.
- Declare some fundamental or pointer variables to represent the internal state of an iterator, as if it was
begin()
- Reimplement the iteration logic in a loop, as if we were calling
operator++()
- For each iteration in the above loop, output a visualization entry
The pseudo and the real
Here is a simplified diagram of the internal structure that boost::unordered_[multi]{map|set} sits on. There is an array of buckets, where each one contains a linked list of nodes.
flowchart LR
subgraph Implementation
direction LR
subgraph Bucket1
direction TB
b1,e1 --> b1,e2
b1,e2 -.-> b1,eM1
end
subgraph Bucket2
direction TB
b2,e1 --> b2,e2
b2,e2 -.-> b2,eM2
end
subgraph BucketN
direction TB
bN,e1 --> bN,e2
bN,e2 -.-> bN,eMN
end
Bucket1 --- Bucket2
Bucket2 -.- BucketN
end
To iterate the table, iterate the array of buckets. Within each bucket, iterate the linked list. This will all be implemented inside a <CustomListItems> element. Note that all variables must be declared at the beginning. Here is the C++ pseudo-code to explain how it’ll be done.
// Pseudo-code
size_t size = size_;
int bucket_index = 0;
auto* current_bucket = &buckets[bucket_index];
auto* node = current_bucket->next;
while (bucket_index != size) {
    current_bucket = &buckets[bucket_index];
    node = current_bucket->next;
    while (node != nullptr) {
        natvis_entry(node->buf.t_);
        node = node->next;
    }
    ++bucket_index;
}
This fully represents begin(), operator*(), and operator++() without creating any class types, and all within a single outer loop. It can be easily translated into natvis syntax.
<Variable Name="size" InitialValue="size_" />
<Variable Name="bucket_index" InitialValue="0" />
<Variable Name="current_bucket" InitialValue="&buckets[bucket_index]" />
<Variable Name="node" InitialValue="current_bucket->next" />
<Loop Condition="bucket_index != size">
<Exec>current_bucket = &buckets[bucket_index]</Exec>
<Exec>node = current_bucket->next</Exec>
<Loop Condition="node != nullptr">
<Item>node->buf.t_</Item>
<Exec>node = node->next</Exec>
</Loop>
<Exec>++bucket_index</Exec>
</Loop>
Giving <Item> a name
There is one last problem. For an unordered_[multi]set, each item is displayed with the name "[i]", where i is an index counting from 0. On the other hand, unordered_[multi]map has each item displayed with the name "[{key}]", where {key} refers to the display name of the key of each pair.
Here is the syntax I want:
<Item Condition="is_map()" Name="[{node->buf.t_.first}]">...</Item>
<Item Condition="!is_map()">...</Item>
This isn’t allowed. An <Item> element directly inside the <Expand> element can have a Condition attribute, but an <Item> element in a <CustomListItems> cannot.
How else can we achieve this behaviour? Well, how does the Microsoft STL implement their natvis? It’s publicly available on GitHub, and it’s on your machine anyway.
It turns out, the only way to achieve this is to duplicate everything. The whole <CustomListItems>. I don’t like this conclusion, and I’ve tried very hard to deduplicate, but I don’t see any other way.
I can achieve the behaviour I want, but at the cost of 2 bespoke table iteration implementions that could be prone to getting out of sync.
Conclusion
I hope this has been useful or interesting for you. These are some tips I would have appreciated knowing before writing all this code. I’d love to save someone else the trouble.
In the next article, I’ll discuss the natvis implementation for the open-addressing containers. These came with their own extra host of challenges.